


HOW TO TAKE LANDMARKS AND LEADING LINES
LANDMARKS
This topic is usually overlooked by a lot of people and can be really important in some fishing days.
Some years ago, when electronic devices were not allowed in spearfishing competitions, all marks were taking using this method.
The landmarks (if we take them properly) are very accurate, you arrive exactly above the place. With the advantage of not needing any specific piece of gear, you only have to remember them.
Once we have some practice, it’s very easy. But it’s necessary to fully understand some ideas to get the maximum precision and not loosing them in the future.
Landmarks are based on leading lines. Taking a leading line is putting two points in the same visual line. The best way to understand this is, for example, with two trees/lampposts. When the two marks are distant from each other (the further they are, the more accurate the leading line is), if we put them one over the other, in the same visual line, we can say they are aligned. The leading lines have been used in navigation since forever. To enter a harbour, for example, leading lines are taken (they can be easily seen in navigation maps).
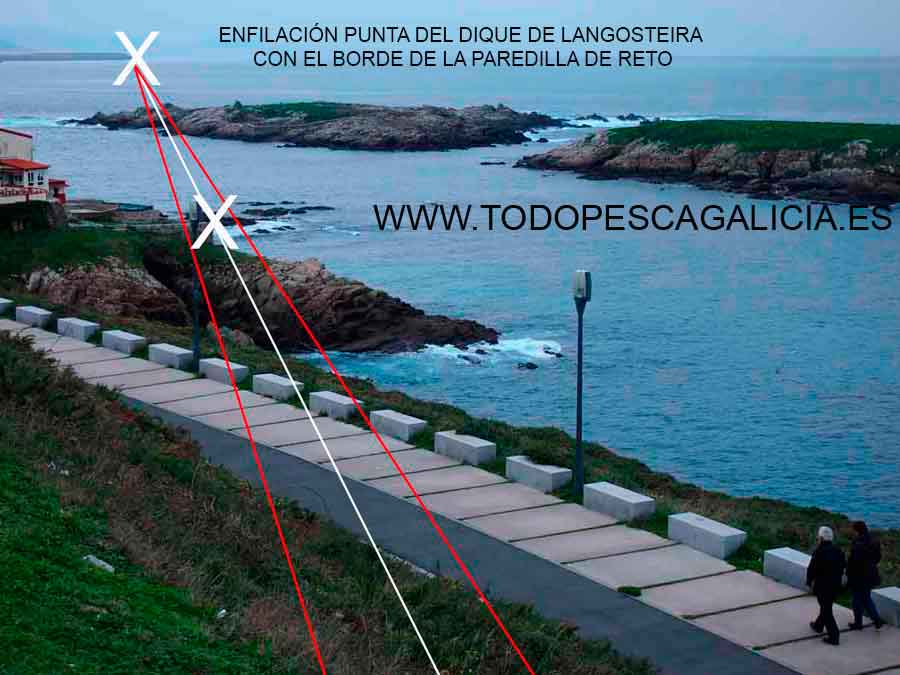

Leading line made by the end of the harbour and the edge of the little wal.
One single leading line shows us a path, a straight line. For example to enter a harbour through a cannal, as we said. But if we take two leading lines at the same moment, they mark a place. They are two straight lines crossing in a single point. It’s easy to see how this method works.
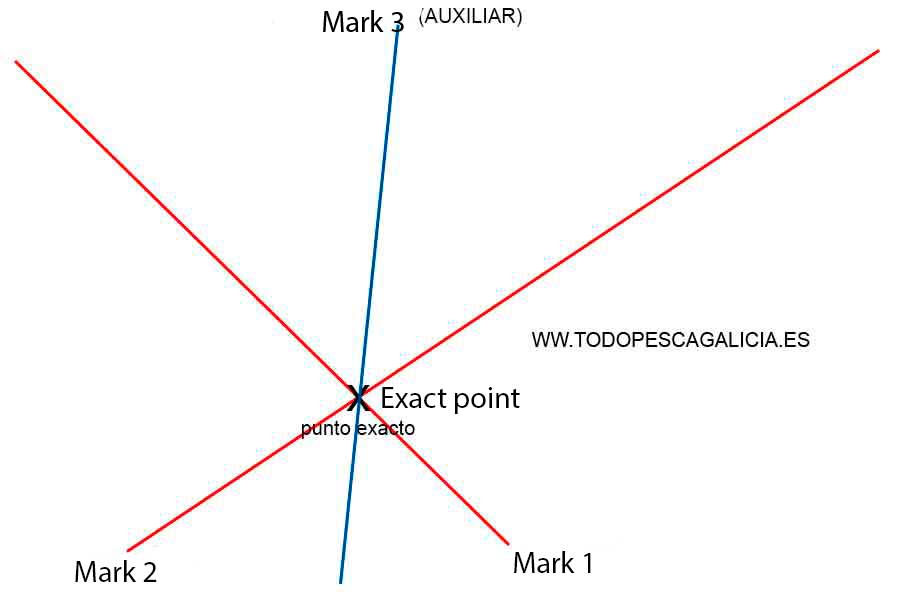

Leading line 3 (auxiliar)
Leading line 2
Exact point
Leading line 1
The wider the angle between them, the more accurate the situation will be. 90º is the ideal angle. If we get far from this, we lose precisión.
To improve the method we can get a 3rd leading line.
Doing this, when we are in a place that we want to mark (a cave, a good spot for deep spearfishing…), we only have to look to both sides and get an easy and clear leading line in each side.
It’s important we choose simple leading lines. Highlighted objects that are easy to identify without chance of doing a mistake. It’s also recommendable to choose something “durable”. It’s easy to loose our marks if we use trees, for example. Buildings, structures or mountains are the best ones.
There is a rule: the leading line stops being effective when the distance between us and the first landmark is bigger than 3 times the distance between both landmarks.
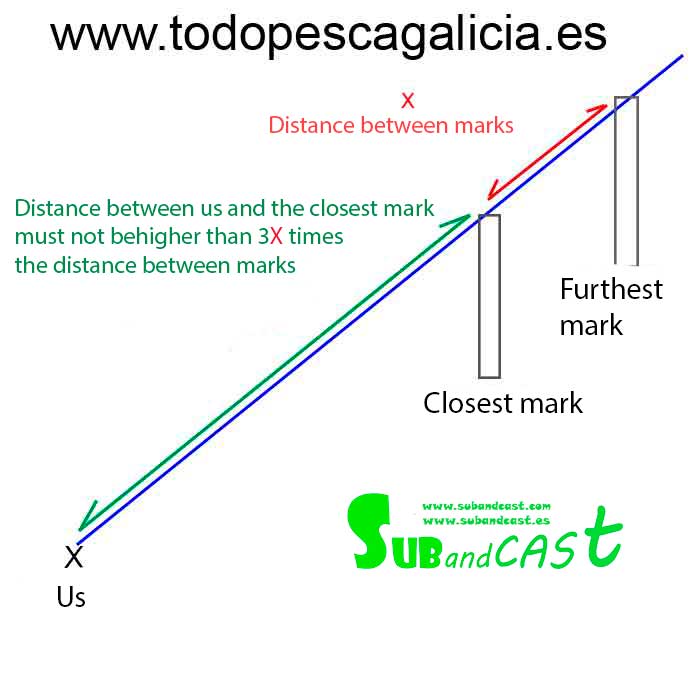

The distance between the observer and the 1st landmark can’t be bigger than 3 times the distance between both landmarks.
Distance between landmarks.
Landmark1
Landmark2
This shows us again that the bigger distance between the landmarks, the better. Two objects that are too close between them won’t give us a reliable leading line.

Landmarks close to each other: less precision
On this last picture, we can see that with close landmarks, even if we are close to them, there is less precision than in the other one.
We should try to take both leading lines as much accurate as possible. If not, we will accumulate a dis-adjustment from one to the other. To avoid this, we can take a 3rd one and reduce the deviation.
If we follow these easy steps, we will go exactly to the desired point without needing a GPS (if we remember the leading lines, of course). This is very useful if we are fishing from the shore. Also if we left the boat anchored or if we don’t have electronic devices.
To make it easier, it can be very useful to carry with us a notebook (like the ones used by the scuba divers) to write down our marks and to find them later.
As we always do, we have a thread in the forums to talk about this article and to post questions.


