How to use and interpretate a fishfinder
INITIATION USING AND INTERPRETING A FISHFINDER
This article is an initiation using and interpreting a fishfinder. Start using it. In a future article we will explain it more exhaustive. Different options as double display or zomm, eg. Double frecuency or structure scan/downscan.
Now we start interpreting a simple image an understanding what´s happen and what are we watching in it.
When we buy a fishfinder, a lot of us don´t know anything else that what´s the bottom or water temperature. Sometimes we can sense that there are a fish, because in the display appears a fish symbol.
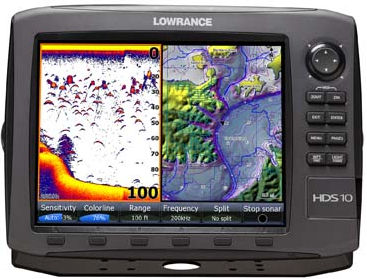
First of all, we need know what´s is a fishfinder and how it works. Really, it´s very simple, it´s an equipment composed by a display, hardware and a transductor.

Display: the panel. Where we can see all wich is receiving the transducer and was codified by the hardware.
Hardware: interprets the echoes received by the transducer and show it as an image.
Transductor: emits and receives echoes in a certain frecuency. It emits this echoes, and when they bounce in the bottom, a fish or any other obstacle they come back to the transducer.
Once issued the echoes, go through the liquid medium and bounce when they find any obstacle. Depending their density (obstacles) the echo´s intensity will be stronger or weaker.
The echo bounced in a fish will be weaker than an echo bounced in a rock. Or in the bottom, in the sand or in mud the echo will be weaker than in a rock.
Althought, by the ship motion and the fishfinder features, an echo of a fish is very peculiar, it´s an arc with extremes looking down, when the display has enough definition. If the fish is very deep or the display hasn´t enough definition, we only see a pixel. So we can understand the importance of the zoom and the size of the display.
We could see that broken rocks, a mud bottom, sand bottom or big blocks will have characteristic echos.
Shoals of fish and algae could be easy diferenciated. Even thermoclines, or different layers of water density, including temperature.
If we have a good fishfinder, a good installation and we know how to use it, there are a lot of posibilities.
An important feature of a fishfinder (more exactly the transducer) is the frequency and the angle. A fewer frequency will penetrated more in the water and will be better for great deep. But it offers less definition and worse target discrimination. We will have less definition with fishes and will be complicated to discern each other.
Higher frequencies offers best target discrimination and definition.
The angle say to us how it covers. A higher angle covers more bottom and a small angle cover less bottom.
If we want to see more zone, in shallow waters, we will use a high frequency, with high angle. A 50Khz has less target discrimination (specially in the bottom or near it) but more penetration.
However a higher frequency, like 83Khz or 200Khz offer less penetration in water column but a better definition and target discrimination.
So, we can resume saying that in shallow waters (less than 100m) we usually use higher frequencies (83Khz-200Khz) In deeper waters (more than 100m) a 50-200 is better. But we must know that angle is not ever associated with the frequency, each transductor has specific characteristics and two 50Khz transducer could have different angles.
Another important factor is the power of the fishfinder. A higher power be equal to better sounder and could work deeper. But today there are new techniques that with less power are equal or better than older fishfinder with more power. We will see that in other article.
Any obstacle creates an echo, more or less powerful. We can eliminate echos wich we don´t want or are not interesting, like mud water. For this we have an adjust, the gain. We can adjust more or less, and we are increasing or decreasing echos. It´s a very important adjust and it´s better could adjust it quickly (a specific button)
With a higher display we will have better definition and easily to use. Of course we are not talking about monochrome displays. Nowadays all are colour and we will talk about it. They are much more exactly and easy to use.
Display definition refers about the capacity to show a point and the size of this one. Eg two displays and the same size, 5”. One of them with double definition. The pixel or the point will be smaller in the display with higher definition. So, we will obtain sharper images and the echoes will be with better form and sharper. In deeper water the differences will be increased.
Of course, fishfinders should be waterproof.
Now, we are going to watch images and interpret how is the bottom: mud, rock, sand… It´s form, where are elevations and when are rocks, broken rocks… And finding fishes, in the bottom, over it in the water column or near surface.
When we are experts we can know how it´s exactly the bottom, where are the fish and what kind.

In this image we could watch an elevation at right. Bottom line ascends quickly and then go down. At the end of the image are other elevation. Before, other two elevations, smallers. In the principal elevation a shoal, we can distinguish easily, a curved form and in clearer colours. And before other spots, broken rocks an blocks, with some fish between. In the right image, with the downscan, we can watch the same. With the two images we obtain a clear image of the bottom. Downscan is specially effective to differentiate targets (fish)

In this image we have a zoom of the last one. Only the elevation. We can see very well the fishes on top. Going down at the right, this red spots with blue tones are more fishes. We can distinguish of the bottom, when they are very close, because of the colour. Fewer echoes. We will not talk about colours, because each fishfinder could have different ones. And in the same fishfinder we can configure it as we like. We only see what type of echo represent each colour. In this case, higher echo is brown, decreasing to reds, oranges, yellows…

Here we have other image where we can watch perfectly everything. The bottom well defined in brown. We can see small elevations. Over the bottom, in orange and yellow colours we have rocks, with fishes over. We can sea very well the fishes in blue colours. If the bottom is flat as the other image, there are nothing unusual, the bottom and any else, maybe any fish. When there are broken rocks, blocks, holes… we obtain this images. This points will be very interesting, because they usually be the best to fishing. Over it at middle waters there are echoes of fishes. There are 50-70m deep, so we can see how big are this rocks.

In this new image we can watch so many things. Big shoals with strong echoes, in yellows and red tones, in the middle of water column. Then other place with rocks and blocks, and so much life, in the left side. In the centre other zone with broken rocks but it seems less life. The downscan, which is the right picture, confirm all of this. We can see very well the fishes and the zone with broken rocks and more fishes.

When we can have doubts, play with the gain could clarify what we are watching. In the image above we have a print with so much gain. We have increased it and then the bottom have a lot of noise. But echoes are stronger. In bottoms where echoes are diffused, the go into yellow tonality which shows rocks and fishes. Also the life that are at both sides of the elevation are so much visible. Nevertheless we lose information about the middle of the water column.
In the picture below is the opposite. In the same place but with a very poor gain.
The fishes are complicated to see in the depths but we have much more information about the water column.

This adjust is very important specially in mud waters, or very clears. Although with algae… Playing with the sensibility (gain) we can always have a suitable image. And when we need to interpret something clearly, playing with it and with the zoom we will obtain the best results

In this last picture we see a flat bottom. There is nothing, sand bottom with small dunes, produced by surface waves. At the left are a place with blocks, as we could see before. In the middle is flat and clear, with only a few fishes. At the end a big elevation. Vertical spots, like curtains, are produced by noise in the transductor, when we accelerate the outboard.
So, a first interpretation of the fishfinder is simple. Most of situations, looking for elevations, good fishing places, rocks and fish, we don´t need much more that we have seen in this article.
As a resume:
Bottom line, dark colour and continuous. It shows the limit of the bottom.
Rocks over the bottom. Change the tonality, with this big spots that we can watch in the images, in red colours (colour depends on fishfinder and different configurations as we have seen before)
Fish, characteristic arcs (we will see it detailed in future articles) and shoal. In the middle of the water column and on the bottom.

